Creating Demos - Coder Tutorial #4
[Unleash the ghost in the machine]
By Polaris
Greetings to all you demo Sceners! I'm excited to bring this tutorial to you, which I wrote roughly two weeks before Halloween. In my home town the temperature has started to drop and the trees are loosing their leaves. It's this chilly fall weather that makes me think of one of the coolest days of the year - Halloween! I hope you'll enjoy this Halloween themed tutorial.
In the last issue I demonstrated how palette effects could be used to simulate motion. During this issue I'm going to expand on that to show how a cross fade effect is achieved. This will introduce you to the concept of interpolation and we will use that in our next issue for some cool vector graphics with tweening. It might seem a little less flashy at the moment, but it's essential to all the cool stuff we'll be doing in the next (and flashier) tutorials.
This is going to be a really spooky and fun issue, so get comfortable... and make sure that Allegro and Dev C++ are handy. (Turn out the lights if you dare.) I'll be assuming that you have mastered the Scene Rep articles from Scene Rep Issues #13 to #15. If not be sure to review them and then come back here. The ghosts will be patient.
Traditional Image Cross fades with the Palette
During the last issue we used mode 13h, with 256 indices of colour. We used these to simulate the wormhole motion by rotating the palette values around in our code. This time we'll extend our techniques to do a cross fade between two images.
In order to do this, I'm going to use some tricks and a lot of bitwise manipulation. I'll explain it as we go along, but a brush up on bitwise operations is in order first. There is a great article by PJ Arends on the "The Code Project" website. Be sure to check it out, and read up on it here: http://www.codeproject.com/cpp/bitbashing.asp. It will make it much easier to follow as we go further.
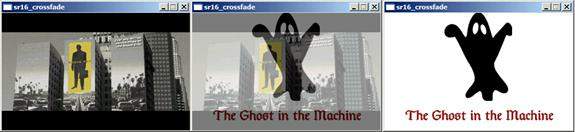
The effect we are looking to achieve is a smooth transition from one image to another. This doesn't happen instantaneously as the image transition takes place over time. For an idea of what this will look like, have a peek at the figure below. You can see the start image, the transition image (50%), and a final image. This is the effect we are working to create.
The Corner Stone Concept - Interpolation
The key to creating any kind of transition value - is called interpolation. At its most basic level, interpolation means estimating the values of a function between two known values. It sounds a lot more complicated than it is. Once you've got basic interpolation down - you will end up using it all over your demo code!
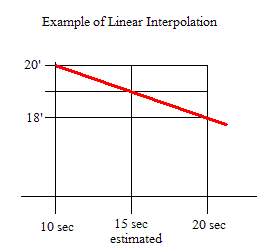 Imagine for a moment that we want to estimate temperature values.
We start our stopwatch. At the ten-second mark, we might see twenty degrees Celsius.
However, at the twenty-second mark... it might have dropped down to eighteen
degrees Celsius. (Wow! It sure got cold fast!). Think for a moment about what the most
likely temperature was at the fifteen second mark. Do you suspect it was nineteen?
Imagine for a moment that we want to estimate temperature values.
We start our stopwatch. At the ten-second mark, we might see twenty degrees Celsius.
However, at the twenty-second mark... it might have dropped down to eighteen
degrees Celsius. (Wow! It sure got cold fast!). Think for a moment about what the most
likely temperature was at the fifteen second mark. Do you suspect it was nineteen?
At this point you've instinctively done linear interpolation. You know that fifteen seconds is half way between 10-seconds and twenty-seconds. You can also probably assume that the temperature was halfway between twenty degrees and 18 degrees. It's like you are drawing a straight linear line between your values - and this is linear interpolation.
I should note that our temperature might not have dropped in a straight line. It could have dropped suddenly to eighteen degrees, even before the fifteen second mark. The key to realize is that linear interpolation isn't the only solution. It does give us gradual transitions, which is what we want for our cross fade effect. In our cross fade effect we aren't just making a single intermediate value, but we are making a range of intermediate values.
The general formula for linear interpolation is as follows:
Interpolated_Value = Start_Value + i*(End_Value - Start_Value)/N
This formula can be used to create a total of N intermediate values between the start value, and the end value. To get our specific value - we plug in i. What's cool is that we can also get our original start and endpoints. When i is 0 - we get our start value. When i/N is 1, we get our end value.
For our temperature example this is:
At 10 seconds: 20 = 20 + 0*(18-20)/2
At 15 seconds: 18 = 20 + 1*(18-20)/2
At 20 seconds: 18 = 20+ 2*(18-20)/2
Another way to look at the function is as follows:
Interpolated_Value = Start_Value + j*(End_Value - Start_Value)
Where J is = i/N. This value ranges from 0-1, so it might be simpler to use the second version of the formula, knowing that j ranges from 0-1. The second formula version is the one we'll use for our cross fade.
Inventing Algorithms
Let's develop our effect algorithm. Imagine for a moment that we don't have a palette... and instead we have just an rgb value for every point on the screen. Our code to cross fade might something like this:
(Please realize, this is only pseudo code, to get the algorithm ideas across)
For x=0 to 319 do
{
            For y=0 to 199 do
            {
                        pixel_1=source_image[x,y].RedIntensity;
                        pixel_2=target_image[x,y],RedIntensity;

                        new_pixel= pixel_1 +  j*(pixel_2- pixel_1);
                        plot (new_pixel,x,y);
            }
}
The pseudo code only takes into account the red colour, but you would do the same thing to Red, Green, and Blue to write a full crossfade effect. Here J ranges in the interval 0-1. Values between 0 and 1 result in a partial mix between the two images.
The problem with this algorithm... is the speed. The algorithm has to scan over 320x200 points, a total of 64000 points. For each of those points it needs to look up the RGB values for the source image, and the target image. It has to interpolate those values and plot the next pixel. That's quite a few operations that have to be done 64000 times! There just wasn't enough cpu power to do this in the old school days; with other effects on the screen at the same time. It's debatable that there isn't enough cpu power to do this now either. Why waste cpu cycles? This is where the palette gets involved.
Power Palette to the Rescue!
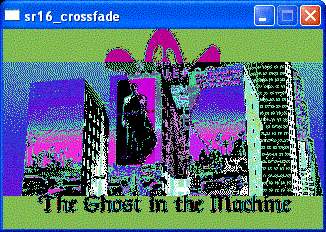
Again, the real trick to this technique is to simulate new visual data without actually changing any data on the screen. To do this we need to have both images on the screen at the same time.
Sound impossible? It isn't really. Remember that we have a 320x200 grid of pixels, and each pixel is one byte of data. From the binary tutorial, you should know that one byte is a total of 8 bits. What if we used the upper nibble (4 bits) to store one image, and the lower nibble to store the other image? Why.. we'd end up with two images in one!
 Sounds great you say... but... that means each image colour gets represented by 4 bits.
This ranges from 0000 to 1111 (or in decimal... 0 to 15). Instead of storing our image
with 256 colour indices, we have to use 16. That's exactly right! It might not be ideal,
however it's still possible to store a pretty good image with just 16 colours. Remember
that these are 16 colour indices, and our palette can be what ever we want it to be.
On the right you can see our two images combined using a upper nibble, and lower nibble
(displayed with the default mode 13h palette).
Sounds great you say... but... that means each image colour gets represented by 4 bits.
This ranges from 0000 to 1111 (or in decimal... 0 to 15). Instead of storing our image
with 256 colour indices, we have to use 16. That's exactly right! It might not be ideal,
however it's still possible to store a pretty good image with just 16 colours. Remember
that these are 16 colour indices, and our palette can be what ever we want it to be.
On the right you can see our two images combined using a upper nibble, and lower nibble
(displayed with the default mode 13h palette).
Step by Step - Image generation
So, let's get started.
1. Select your source and target images. I'd suggest taking the package crossfade_example.zip from the bonus pack, and using image_1.pcx and image_2.pcx.
2. If you've selected to use your own images - perform the following steps
with a graphics program. You can use gimp, psp, or a similar product.
I'm a big fan of PSP - from JASC. You can download an evaluation product from
their website at www.jasc.com
a. Load the image you want to start with.
b. Reduce the image to 16 colours. Use dithering if you want.
Experiment to get a feel for how your image will best look.
c. Important - Increase your image to 256 colours. This is to help allegro
read the file. The image will only be using indices 0-15, but will have
a standard colour range and palette.
d. Save your image as a PCX file. I called mine image_1.pcx,
and image_2.pcx respectively.
e. Repeat the steps for your second image.
3. Congrats! You've created your image set.
Onscreen - Creating both images at once.
We've got our source images, but we'll need a way to combine them into a new image. In allegro images are stored in bitmap data structures. To keep things sensible, I think it's time to start using functions. To combine both images, we'll write a create_combined_bitmap function.
The function will need to accept a pointer to the source bitmap, the destination bitmap and the resulting combined bitmap. Here is my function header for this:
void create_combined_bitmap(BITMAP *image_1,BITMAP *image_2, BITMAP *image_target);
So, we need to put all our data into the image_target. I'll assume that image target is actually set up to receive data. We'll have to make sure we allocate image_target before calling create_combined_bitmap.
Create combined bitmap packs two pixels of two images with the colour range (0-15) into a single pixel ranging from 0-255. We use the getpixel function to get pixels from our source images.
Our upper nibble would be: getpixel(image_1,x,y)<<4
And our lower nibble is: getpixel(image_2,x,y));
To combine them into a resulting image:
  for (x=0;x<320;x++)
      for (y=0;y<200;y++)
            putpixel(image_target,x,y,
                        (getpixel(image_1,x,y)<<4) | getpixel(image_2,x,y)); // *
* notice: we are using a bitwise or to combine the two values. We could have used addition, but bitwise or does the job well, and tends to be more efficient.
Voila! We have our resulting combined image. Confused? Have a peak at main.cpp in crossfade_example.zip, and come back here. (Or email me!)
Lights Camera Action! - Creating our Interpolated Palette
Well! We are almost there. We've created a combined image... however... we don't yet have a cross fade effect. We need to create a special palette to give varying levels of visibility to each combined colour - depending on the degree of our crossfade. To do this, we'll create a new function:
void generate_intermediate_palette

(PALETTE image1, PALETTE image2,  PALETTE intermediate, float degree)
The palette of image1, is the unmodified palette of the starting image. Similarly, the palette of image2, is the unmodified image of the destination. We'll be creating the intermediate palette based on our degree (0-1).
This part gets a bit tricky. I think it's useful to first think of what it takes to display our first image without any of the second image appearing visible. To do this, we need to map our total of 256 colour indices to one of the 16 colours in the palette for image one. Have a look:
for (x=0;x<256;x++)
{
        intermediate[x].r=image1[x>>4].r;
        intermediate[x].g=image1[x>>4].g;
        intermediate[x].b=image1[x>>4].b;
}
This generates the intermediate palette, based only on the upper nibble. (In right shifting the binary by 4, it throws away the lower nibble). If we displayed the combined image, with the intermediate palette - we would see only the image represented in the upper nibble.
At this point, it's good to think about it the other way. How do we get the values for the lower nibble? It's pretty simple with a bit wise &emp; operation:
for (x=0;x<256;x++)
{
        intermediate[x].r=image2[x&0x0F].r;
        intermediate[x].g=image2[x&0x0F].g;
        intermediate[x].b=image2[x&0x0F].b;
}
Ready? Set? Interpolate!
Aha! We are almost ready to make our palette on the fly. We have two routines that give us the colour value for image1, and image2. All we need to do now is to interpolate those two values (for each RGB), and we get an intermediate colour. This gives us our cross fade. We simply use the formula:
Interpolated_Value = Start_Value + j*(End_Value - Start_Value)
void generate_intermediate_palette(PALETTE image1, PALETTE image2,
                                    PALETTE intermediate, float degree)
{
    int x;

    for (x=0;x<256;x++)
    {
       // calculates the intermediate colour r,g,b values
       intermediate[x].r=image1[x>>4].r+
              (int)(degree*(float)(image2[x&0x0F].r-image1[x>>4].r));

       intermediate[x].g=image1[x>>4].g+
              (int)(degree*(float)(image2[x&0x0F].g-image1[x>>4].g));

       intermediate[x].b=image1[x>>4].b+
              (int)(degree*(float)(image2[x&0x0F].b-image1[x>>4].b));
}
The Spooky Main Program
At this point we have our basic routines. All that remains is to use them. We start with a few variables - to store all our data:
    int i; // global frame counter
    BITMAP *image_1;    // the image from the pcx file (upper nibble)
    PALETTE palette_1;  // the palette from the pcx file

    BITMAP *image_2;    // the image from the pcx file (lower nibble)
    PALETTE palette_2;  // the palette from the pcx file

    BITMAP *image_combo;    // the target combined image that's crossfaded
    PALETTE palette_combo;  // the target combined image that's crossfaded
Then we load our images, and allocate space.
             // setup our images
image_1 = load_bitmap("image_1.PCX", palette_1); // first image
            image_2 = load_bitmap("image_2.PCX", palette_2); // second image
            image_combo = create_bitmap(320, 200);    // combined image
We create our combined image, and display it:
            // create our combined bitmap
            create_combined_bitmap(image_1,image_2, image_combo);
            blit(image_combo, screen, 0, 0, 0,0,320,200);
And enjoy a simple main loop generating our palette on the fly:
    i=0; // set frame counter
    while (!key[KEY_ESC])
    {
        i++;

        generate_intermediate_palette(palette_1,palette_2, palette_combo,
                fabs(1.0f - fmod((float)i/200,2.0f)));
        set_palette(palette_combo);
        rest(10);
     };
Great Balls of Fire!
Wow! There you have the entire cross fade routine. Lost? Curious? Looking for it all together in a nice package? Check out the source code in crossfade_example.zip.
What's really impressive about the routine is how many operations we've saved. We still need to interpolate rgb sets, and need to do pretty much the same amount of work as we would need per pixel. However, instead of 64000 pixels, we have to only work with 256 palette values. This is less than 0.05% of the work if we did it in our first naive algorithm. Now! What should we do with all those cpu cycles I wonder......
Coming Soon - in The Next SR!
Well folks, I hope this issue sucked you in and got you excited for even more demo scene goodness. Next issue I'll bring morphing and tweening to life, instead of just teasing you about it. We'll make some cool on screen animations. With some creativity you can extend it to create a cool Christmas Card!
Until then - play, code and have fun. Let me know what you create, or even better - let me know what you would like to create! I'll be glad to feature tutorial requests.
Stay spooky!